A recent BIOS update can sometimes trigger a BitLocker recovery key prompt — even if you never manually turned on BitLocker. Many Lenovo and Windows users encounter this after updating through Lenovo Vantage or other system tools.
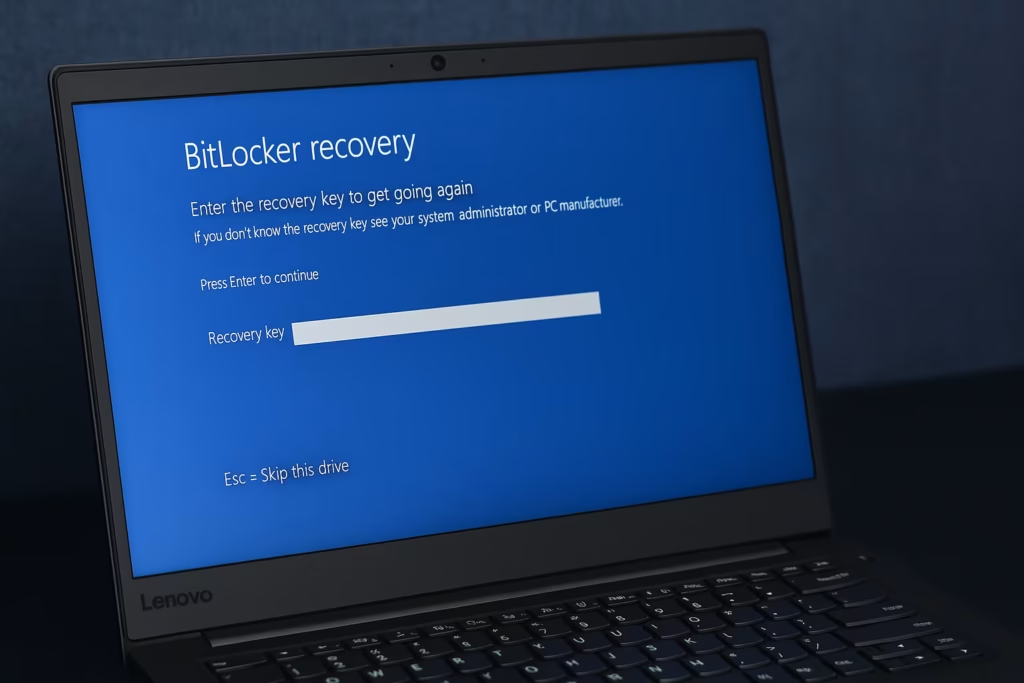
If you’re suddenly locked out and see a message asking for a BitLocker recovery key, don’t panic. This guide explains why this happens, how to find your missing recovery key, and what to do if it’s truly lost.
Why Windows Is Asking for a BitLocker Key
BitLocker is Microsoft’s built-in drive encryption tool that automatically protects your data by linking encryption keys to your hardware (TPM chip) and Microsoft account.
When you update your BIOS, the system hardware signature can change — making Windows think it’s a new or tampered device. To ensure your data’s safety, BitLocker demands the recovery key before allowing boot access.
Even if you never manually enabled BitLocker, it’s often activated automatically when:
- You signed in with a Microsoft account during setup.
- The PC was preconfigured by Lenovo, Dell, or HP.
- Your device is managed by a school or workplace.
Step-by-Step: How to Recover BitLocker Key
1. Check Your Microsoft Account
The most common place for your BitLocker key is your Microsoft account.
- Visit https://account.microsoft.com/devices/recoverykey
- Sign in using all Microsoft accounts you’ve ever used on that PC — personal, school, or work.
- If BitLocker was backed up automatically, you’ll see your device name and recovery key.
Tip: Try old or secondary accounts too. Sometimes the device was originally set up using a different login.
2. Check for Local or External Backup Files
When BitLocker activates, Windows gives the option to save or print the key. Search your files for:
- USB drives you used when setting up your PC.
- Any text files named like “BitLocker Recovery Key.txt”.
- Printed copies in case you stored them offline.
3. Check Organization or School Accounts
If your laptop is issued by a company or educational institution:
- Contact your IT administrator or helpdesk.
- They can retrieve your key through Microsoft Entra ID (Azure AD) if the device is managed.
- You may need to provide the Recovery Key ID visible on your BitLocker prompt.
4. Use a BitLocker Self-Service Portal (If Available)
Some organizations host their own BitLocker key recovery portal.
Go to that internal link (usually accessible from your intranet), enter your Recovery Key ID, and retrieve your key.
If You Can’t Find the Key
If none of the above methods work, unfortunately there’s no way to bypass BitLocker. The encryption is designed to be unbreakable — even Microsoft or Lenovo support cannot unlock your drive without the key.
Your only option is to reinstall Windows.
How to Reinstall Windows (Last Resort)
Step 1: Create Installation Media
- On another working computer, visit: https://www.microsoft.com/software-download/windows11
- Download the Media Creation Tool.
- Use it to create a bootable USB drive (8GB or larger).
Step 2: Boot From USB
- Insert the USB into your locked PC.
- Turn it on and press F12, Esc, or Del (depending on your brand) to access the boot menu.
- Select the USB drive to boot into Windows Setup.
Step 3: Reinstall Windows
- Choose Custom Install during setup.
- Delete all partitions (this erases the encrypted data).
- Proceed with installation.
Once setup completes, your PC will boot normally.
Step 4: Link Your Microsoft Account
When reinstalling, sign in with your Microsoft account so that:
- BitLocker keys will automatically back up online.
- You’ll avoid this issue in the future if BIOS or TPM changes again.
The BitLocker recovery prompt after a BIOS update is a safety measure — not a bug. It means your PC’s encryption detected a hardware change. If your recovery key is missing, you can only recover it from your Microsoft account, organization, or local backup.
If no key exists, the only solution is to clean install Windows, which resets your system while keeping your device secure.
Read More:
- How to Restrict Domain Logins to Windows 11 24H2 or Higher
- How to Fix “Connection to Server Not Supporting” in Windows 11
- Fix: Can’t Turn On Network Discovery in Windows 11? Here’s How
- Fix “Something Happened to Your PIN” Windows Sign-In Error
- Fix Azure Login Error AADSTS5000225: “Sorry, We’re Having Trouble Verifying Your Account”
Additional Tip
After reinstalling Windows, immediately turn off automatic BitLocker activation if you prefer manual control:
- Go to Control Panel → System and Security → BitLocker Drive Encryption.
- Click Turn Off BitLocker.
This prevents silent reactivation during future firmware or BIOS updates.