If you’re a nonprofit using Microsoft’s cloud credits, it can be confusing when your Azure Sponsorship suddenly ends even though you have a valid Microsoft for Nonprofits Azure Grant. This mix-up can result in your subscription being converted to Pay-As-You-Go, causing unexpected charges.
Microsoft provides nonprofits with $3,500 (USD) in Azure credits annually through the Azure Grant program. These credits are valid for 12 months and must be renewed each year.
Sometimes, organizations may also receive a separate Azure Sponsorship — a temporary credit program offered for testing, events, or migrations. The confusion arises when:
- The sponsorship period ends (e.g., October 13, 2025),
- And the new grant (renewed September 24, 2025) is not yet linked to the same Azure subscription.
As a result, Azure automatically reverts that subscription to Pay-As-You-Go, which starts charging your credit card or payment method.
Why This Happens
Several billing and subscription mismatches can trigger this issue:
| Cause | Explanation |
|---|---|
| Separate Subscription IDs | The new Azure Grant was issued under a different subscription ID than the sponsorship account. |
| Grant not applied automatically | The renewal email confirms your eligibility but doesn’t always auto-link the credits to your old account. |
| Expired Sponsorship Conversion | When a sponsorship ends, Azure converts it to a Pay-As-You-Go subscription unless another credit is attached. |
| Different Billing Profiles | The grant may exist under one billing profile, while your active Azure resources are billed under another. |
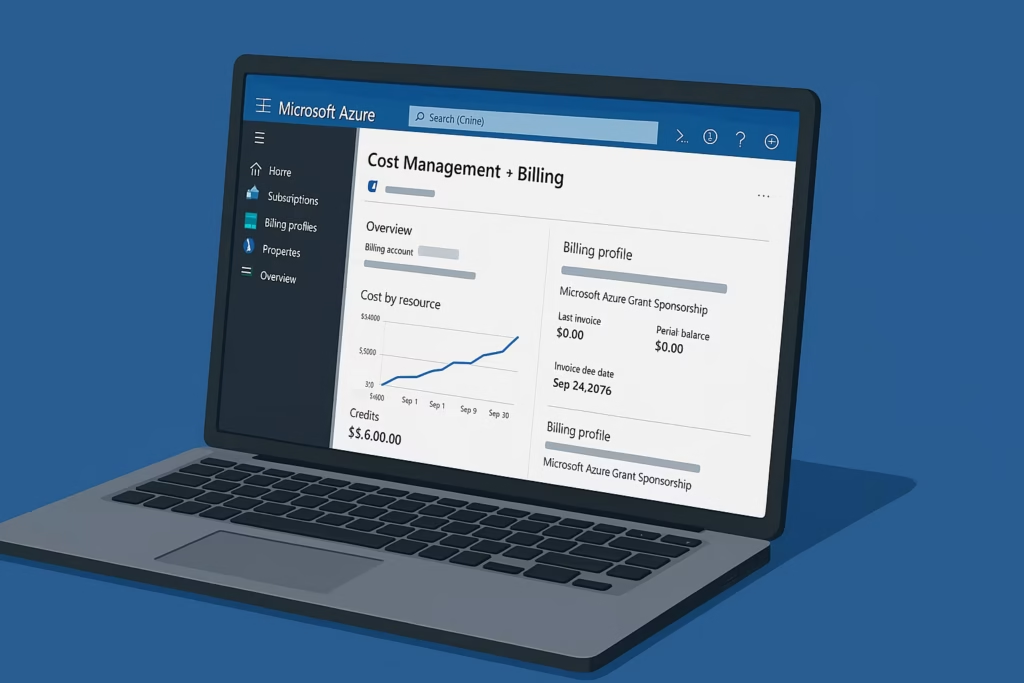
Step 1: Verify Your Grant Status in Azure
Start by confirming whether your active Azure subscription is still linked to the nonprofit grant.
- Log in to Azure Portal.
- Go to Cost Management + Billing → select Billing Profiles.
- Click on Subscriptions under the active profile.
- Check the Offer Type — it should read: Microsoft Azure Grant Sponsorship
If it shows Pay-As-You-Go, your grant credit is not applied. - Note the Subscription ID and Billing Account Name. You’ll need these when contacting support.
Step 2: Confirm Your Grant Activation Email
Open your Microsoft Nonprofit Grant Renewal Email and verify:
- Grant validity period: e.g., September 24, 2025 – September 24, 2026
- Claim link: Ensure you completed the activation process using the same admin account tied to your Azure tenant.
- If the grant was claimed using a different email or tenant, it creates a new subscription that doesn’t carry over existing resources.
Step 3: Relink the Grant to the Correct Subscription
If your Azure subscription was switched to Pay-As-You-Go, follow these steps:
- Visit the Microsoft Nonprofit Support Portal.
- Sign in with the Global Administrator account associated with your nonprofit.
- Create a support ticket under: Category: Billing & Subscriptions
Topic: Azure Nonprofit Grant / Sponsorship - In your message, include:
- Your organization name and Tenant ID
- The grant confirmation email (with date and reference number)
- The Subscription ID of the Pay-As-You-Go account
- A request to link the active Azure Grant to your existing subscription
Once support confirms the correction, you’ll see your grant balance appear under “Credits” in the Cost Management dashboard.
Step 4: Avoid Future Billing Charges
After your grant is relinked, prevent further billing issues with these tips:
- Monitor your subscriptions monthly:
- Go to Cost Management → Usage + Charges to confirm that credit usage deducts from the grant balance.
- Cancel or delete Pay-As-You-Go subscriptions:
- Once your grant is active, remove any extra pay-as-you-go subscriptions to avoid confusion.
- Set up spending alerts:
- Create budget alerts under Cost Management → Budgets to receive email notifications when nearing credit limits.
- Renew your grant early:
- Microsoft allows renewal 30 days before expiration — this helps prevent gaps between old and new grants.
Additional Notes
- Azure Grants and Sponsorships are not the same offer type. Even though both display “Microsoft Sponsorship” in some areas, their back-end billing structures differ.
- If your organization had multiple admins, verify that the same tenant was used for claiming the grant renewal. Using a different tenant will create an entirely separate billing profile.
- You can confirm the active credit amount via the Azure Sponsorship Portal: https://www.microsoftazuresponsorships.com
Step 5: Contact Microsoft Billing if Charges Already Occurred
If Azure has already billed your payment method:
- Go to Help + Support → New Support Request in the Azure Portal.
- Select Billing → Incorrect Charges.
- Provide screenshots of your grant confirmation and usage history.
- Microsoft typically issues refunds or adjustments if the charges were caused by grant linking delays.
Read More:
- Fix Azure Virtual Desktop Microphone Not Working Issue
- Fix: GPT-5 Quota Increase Request Issues in Azure AI Foundry
- How to Perform AKS Cluster Migration from East US to Germany West Central
- Fix “Billing ID Unknown” in Azure Subscription – Complete Azure Billing ID Unknown Fix Guide
- Fix Azure HSM Pool Billing: How to Stop Unexpected Charges and Request Refund
- Fix Azure CLI “DLL Load Failed While Importing win32file” Error on Windows
The Azure Nonprofit Grant program is a fantastic resource — but the transition between sponsorships and annual grants can create confusion if billing profiles or tenants differ.
By confirming your subscription’s offer type, linking your grant to the correct tenant, and setting usage alerts, you can make sure your organization uses its free credits safely — without unexpected charges.