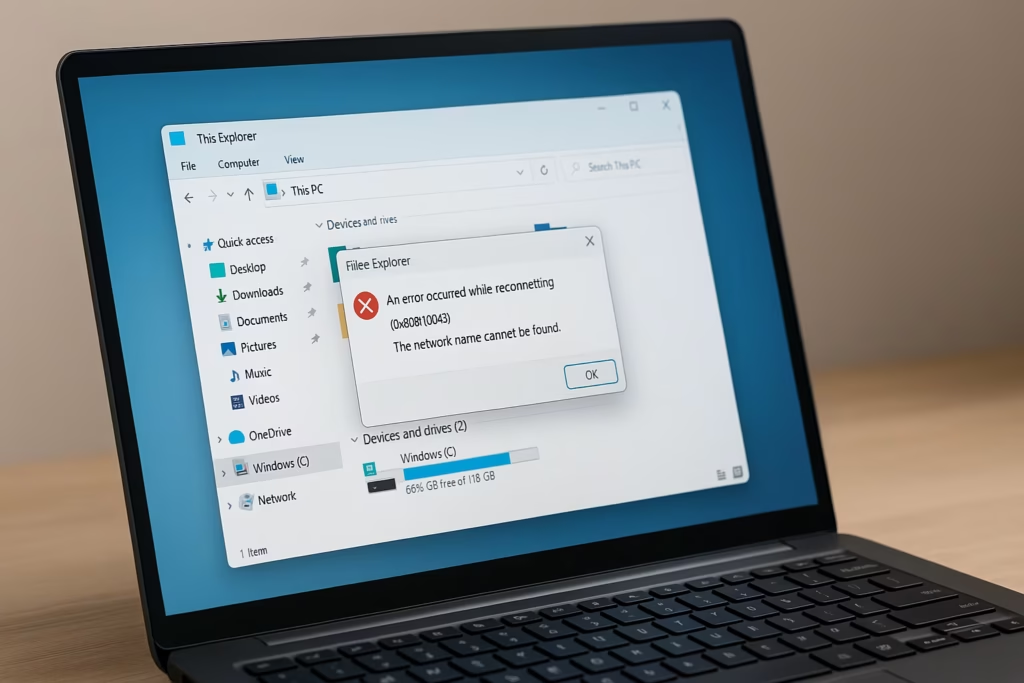
If your Windows PC intermittently fails to recognize your Synology NAS and shows error 0x80070043, you’re not alone. Many users have faced this issue after a Windows update, where their NAS disappears from File Explorer, can’t be pinged by name, and throws “Access Denied” errors when refreshing NetBIOS.
What Causes Error 0x80070043?
This issue usually appears when Windows fails to resolve the NAS hostname or cache refreshes incorrectly. Common causes include:
- NetBIOS caching or registration failure
- SMB protocol mismatch (SMB1 disabled in new Windows builds)
- Network Discovery or Firewall blocking
- Outdated or conflicting network mappings
- NAS using a dynamic IP address that changes after reboot
These result in “Network path not found” or “Ping request could not find host NASname” errors when accessing your NAS.
Step-by-Step Fix for Synology NAS Not Recognized in Windows
1. Run Network Reset Commands as Administrator
If nbtstat -RR or similar commands show “Access Denied,” you’re not running them with elevated privileges.
Steps:
- Right-click Start → Windows Terminal (Admin) or Command Prompt (Admin)
- Type each command below and press Enter after each:
ipconfig /flushdns
nbtstat -R
nbtstat -RR
These commands flush your DNS cache and re-register the NetBIOS names so your computer can rediscover the NAS on the network.
- Close File Explorer and reopen it. Try accessing your NAS again using:
\\NASname2. Delete Old Network Mappings
Windows sometimes keeps invalid drive mappings that block reconnection.
Run this command as Administrator:
net use * /delete /yThen remap your NAS share:
net use Z: \\NASname\SharedFolderReplace Z: with your preferred drive letter and SharedFolder with your NAS folder name.
3. Enable SMB Protocol Support
Recent Windows versions disable SMB1 by default for security reasons, but some older NAS models still rely on it.
To enable SMB 1.0 temporarily:
- Press Win + R, type
optionalfeatures.exe, and hit Enter. - Scroll down and check SMB 1.0/CIFS File Sharing Support.
- Click OK and restart your PC.
Tip: If your NAS supports SMB2 or SMB3, enable those instead in Synology DSM for better security and speed.
4. Turn On Network Discovery
Make sure Windows can detect devices on your local network.
- Open Control Panel → Network and Sharing Center → Advanced sharing settings
- Under your current network profile, select:
- Turn on Network discovery
- Turn on File and printer sharing
- Click Save changes, then restart your computer.
5. Disable Conflicting Firewalls or VPNs
VPNs and antivirus tools like Bitdefender or Kaspersky can block SMB traffic (ports 137–139, 445).
- Temporarily disable third-party firewalls.
- Add your NAS IP to the trusted zone.
- Reconnect after testing.
6. Use NAS IP Address Instead of Name
If your NAS hostname fails to resolve, try accessing it directly via IP:
\\192.168.x.xIf this works, it confirms a NetBIOS name resolution issue. Continue with Step 1 and 3 to fix it permanently.
7. Assign a Static IP to the NAS
If your router assigns a new IP to the NAS after every reboot, Windows may lose track of it.
You can fix this by:
- Logging into Synology DSM → Control Panel → Network → Network Interface → Edit → IPv4 → Manual
OR - Setting a DHCP reservation for the NAS MAC address in your router.
8. Automate Daily Network Refresh (Optional)
If your NAS still vanishes randomly, create a daily refresh script.
Steps:
- Open Notepad and paste:
ipconfig /flushdns
nbtstat -R
nbtstat -RR- Save as
refresh_network.bat. - Open Task Scheduler → Create Task → Run with highest privileges, and set it to run daily.
Additional Checks
If your issue persists:
- Open Event Viewer → System Logs and look for
NetBT,SMBClient, orSrverrors. - Ensure Windows updates and Synology DSM firmware are current.
- Check if other devices on the same network can still access the NAS (to isolate Windows-specific issues).
Error 0x80070043 usually points to a Windows name resolution or SMB sharing bug, especially after updates. Most users fix it by re-registering NetBIOS, clearing mappings, and ensuring SMB protocols match between Windows and Synology.
Read More:
- Fix Netflix Stuck at 540p – Play Netflix in High Resolution
- Fix: Installation Failed in the SAFE_OS Phase Error (0xC1900101)
- Fix: Intel Extension 2.1.10105.19 update keeps reinstalling
- How to Fix Windows 11 25H2 Search Not Working After Update
- Fix: Enter Old PC Name in Windows Backup During File Transfer
- Fix Windows 11 Printer Driver Unavailable Error
- Fix Windows VPN Client Never Connects in First Shot (L2TP/IPsec MFA Issue on Windows 10/11)
- How to Fix Windows 11 Update Error 0x800f0983 (KB5066835 Installation Failed)
If the NAS still disappears after a reboot, setting a static IP and automating the nbtstat refresh command generally keeps things stable.